


Introduction
This post is the second in a series about alternatives to bastion hosts in each of the major cloud providers. The first post covered an introduction to bastion hosts, the SSH multiplexing attack, some disadvantages to managing your own bastions, and an alternative solution in GCP. In this post, we’ll cover the Session Manager service provided by AWS. Although there are other methods for accessing EC2 instances in AWS, Session Manager is the best match for our requirements, which are:
- Does not require public IP addresses for the VMs.
- Eliminates the possibility of SSH multiplexing attacks.
- Consolidates access (such as SSH or RDP) to IAM credentials.
- Captures metadata and full session logs (when possible) for remote access.
The Session Manager service is provided as a component of AWS Systems Manager. To use Session Manager, you must set up AWS Systems Manager. While Session Manager supports Linux and Windows instances, we will focus on using it with Elastic Compute Cloud (EC2) Linux instances running in AWS. If you have a hybrid environment, which also contains VMs in your own facility, then you can still use this solution with some additional steps that we do not cover in this post.
Why AWS Session Manager?
Session Manager can be used to access instances within private subnets that allow no ingress from the internet. This is made possible by the Systems Manager (SSM) agent running on the EC2 instances, which pushes traffic to the Session Manager service. The configuration shown in the diagram below provides an example of how it can be configured, which will be explained in more detail in the sections below.
The figure shows that the EC2 instances are not at all accessible from the internet, even by our authorized client. The SSM agent starts the session for us, and pushes traffic to the interface endpoints we’ve created in the VPC for the SSM services. The Session Manager service acts as the intermediary, providing the client with a shell for an EC2 instance.
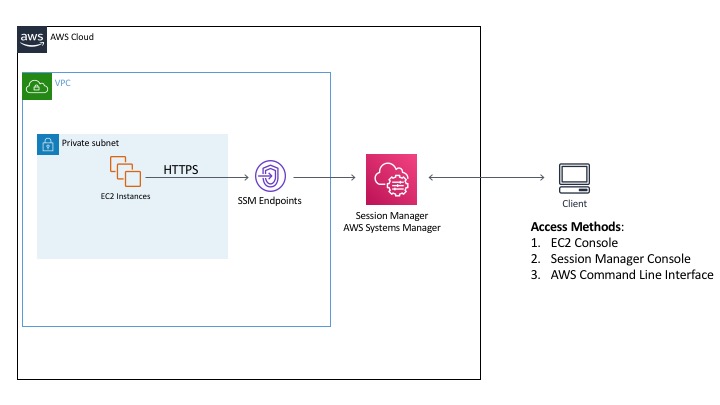
The client machine is outside of AWS, and is being used by someone with valid user credentials for the AWS environment. The client can create a session in two different parts of the AWS console, or via the AWS Command Line Interface (CLI). It is possible to restrict how users launch sessions, so you could choose to only allow them to invoke a connection via the AWS CLI (which requires the installation of the Session Manager Plugin) if your users don’t have the ability to log into the console, or the other way around.
AWS SSM provides the ability to establish a shell on your systems through its native service, or by using it as a tunnel for other protocols, such as Secure Shell (SSH). The advantages of using SSM without tunneling SSH are:
- It will log the commands issued during the session, as well as the results. If you use SSH within Session Manager, then this will all be encrypted.
- No need to manage SSH keys.
- Shell access is completely contained within Identity and Access Management (IAM) policies, so there is one central choke point to control that access.
Now that you have an idea of how AWS SSM works in general, we’ll take a closer look at it by breaking down the details into the following categories:
- Networking Considerations
- Virtual Machine Configuration
- Identity Management
- Logging
Networking Considerations
As shown in our diagram above, the SSM agent actually uses HTTPS. The amount of network traffic that needs to be allowed is minimal. If you follow the steps below, then it is not necessary to open port 22 to ingress traffic, even within the VPC:
- Create VPC interface endpoints in the target VPCs. This makes use of AWS PrivateLink, so the connection traffic between the target EC2 instances and the Session Manager service does not traverse the internet. Create the endpoints for the following service names (substitute your own region in the names below, such as ‘us-west-2’):
- com.amazonaws.[region].ssm
- com.amazonaws.[region].ssmmessages
- Configure the Security Groups and Network ACLs that protect the target EC2 instances to allow HTTPS egress traffic (443) from the instances to the Systems Manager endpoints. It is not necessary to allow any ingress traffic to the EC2 instances. The way we recommend to configure this is to add the endpoints and EC2 instances to a security group, and only allow the traffic within the members of that security group:
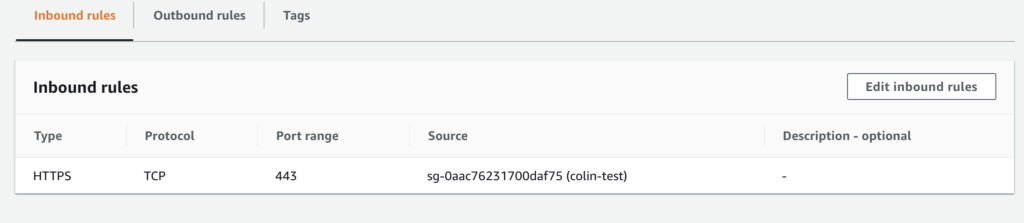
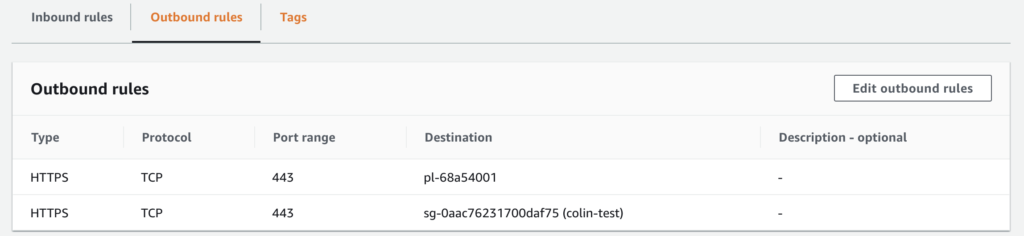
The configuration above shows that the security group allows HTTPS between network interfaces that are members of the security group. In addition, it allows outgoing HTTPS only to the prefix list (pl-68a54001), which contains our gateway to S3. The S3 gateway will be covered in our logging section.
Virtual Machine Configuration
Complete the prerequisites
The prerequisites for Systems Manager must be satisfied on each EC2 instance, which includes installing the Systems Manager (SSM) agent. The Amazon Linux images already include the agent, and you can install it manually on other Linux systems. The agent allows a lot more than just connecting with Session Manager. More information about its capabilities is available here. If you want to use it on a system that is not currently supported, you can always download the code and modify it yourself. However, AWS will not support a modified version of the agent.
Grant instances access to AWS
Each EC2 instance must have permission to make certain API calls to the Session Manager Service. All necessary permissions are available in the Amazon managed IAM policy, AmazonSSMManagedInstanceCore. However, if you only want to apply the permissions necessary for Session Manager by creating a custom profile, there is more information on how to do that here.
Identity Management
The Systems Manager agent will create a local user on both Windows and Linux-based EC2 instances, called ‘ssm-user’. If the user is not created, it may be due to incorrect permissions applied to the instance profile. The ssm-user will be added to the sudoers file in Linux and added to the Administrators group on Windows instances. Since the ssm-user is a privileged user, AWS recommends that you further restrict the permissions around using Systems Manager. Session access can actually be restricted using instance tags and the commands can be restricted within a SSM document.
Using this method to access the instances does not require any management of SSH keys. Since everything is managed through the Session Manager, access is only based on IAM policies. When configuring Session Manager access for your end-users, you can limit which instances they access, whether it’s through the command line or the console, and if they are allowed to tunnel SSH or just use the regular Session Manager shell access. More information about how to configure the IAM policies is available here. Some of the AWS policy templates show how to restrict access to specific EC2 instances, but that will probably not be a scalable approach if you really want to implement this for your organization. Instead, you can refer to templates available here to see how to configure the policies to allow access based on tags. You will also want to make sure you add permissions for users to terminate only the sessions they started, as shown here. Otherwise, a user may be able to terminate another user’s session.
Logging
CloudTrail
Without configuring anything, AWS CloudTrail will collect basic information about sessions. When someone launches a remote access session with Session Manager, SSM will log an event named, “StartSession.” This event will include a number of interesting things, such as:
- The username that launched the session
- In some cases, whether the user was authenticated with multi-factor authentication (MFA)
- The originating IP address
- The unique ID of the target EC2 instance
- The session ID
Additional information about what events are logged by CloudTrail is available here. The events in CloudTrail are useful for getting a sense of who’s logging into your instances and when it’s happening. However, it does not provide you with any information about what they are doing once they’ve established a session.
Session data logs
If you are interested in capturing the commands issued during each session, it is possible to do this directly from Session Manager. As mentioned in the overview of AWS Session Manager, SSM uses HTTPS to establish sessions, but it is also possible to use it as a tunnel for other protocols, such as SSH or RDP. Be aware that if you choose to use the tunneling option, then AWS cannot provide full session logs for those connections. The sections below will cover the case where you are using SSM directly and full session logs are available.
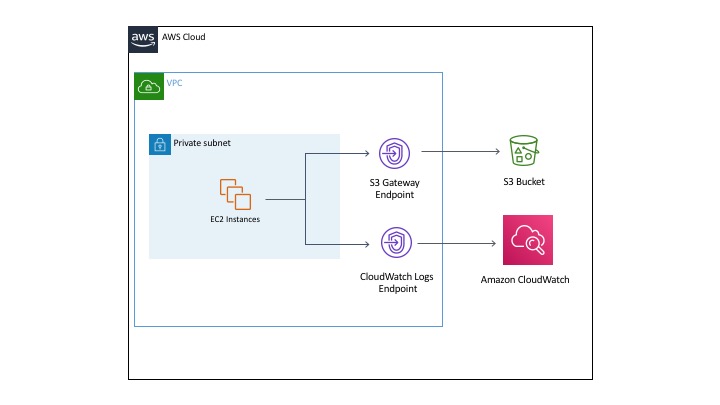
The diagram below shows an example configuration for logging full session data either to CloudWatch or S3.
Session data in CloudWatch
There are a couple of methods that can be used to save session logs to CloudWatch. One requires very little additional configuration by using the SSM agent to send logs to CloudWatch. Although this is the easiest method, it’s being deprecated by AWS. The other method is to install and configure the CloudWatch agent on your EC2 instances to send the logs to CloudWatch. In the sections below we’ll cover the prerequisite steps necessary no matter which agent you use, and then cover each method in more detail.
Universal steps for CloudWatch
The first step is to select a CloudWatch log group to use for session data. If you don’t already have one to use, you must create a log group.
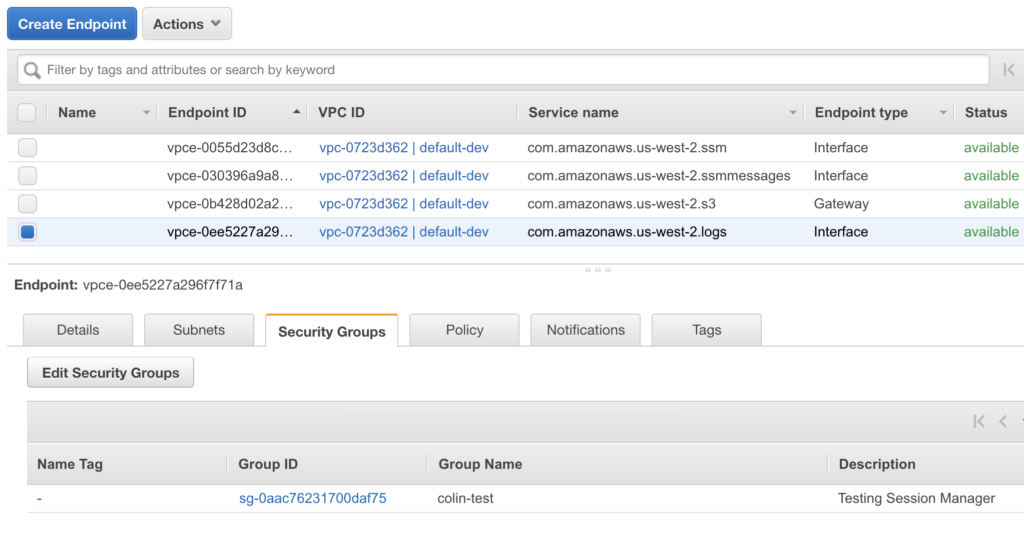
Depending on your network configuration, you may need to use a VPC endpoint for the CloudWatch Logs service. We’ve chosen to use an endpoint (shown in the diagram above). The endpoint for CloudWatch Logs has the following name (substitute your own region in the name below, such as ‘us-west-2’): com.amazonaws.[region].logs
Once the endpoint has been created, it can be added to a security group with the EC2 instances that allow HTTPS traffic (the security group rules are shown in the Network Considerations section). No modifications are required to the security group to allow any additional traffic, and now your EC2 instances will be able to send logs to CloudWatch. The screenshot below shows the endpoint in our VPC console, and the fact that it’s a member of our security group:
Once you have CloudWatch set up, you must set the Session Manager Preferences to use the log group:
- Go to the Systems Manager section of the AWS Console, and select “Session Manager”. It will look like this:
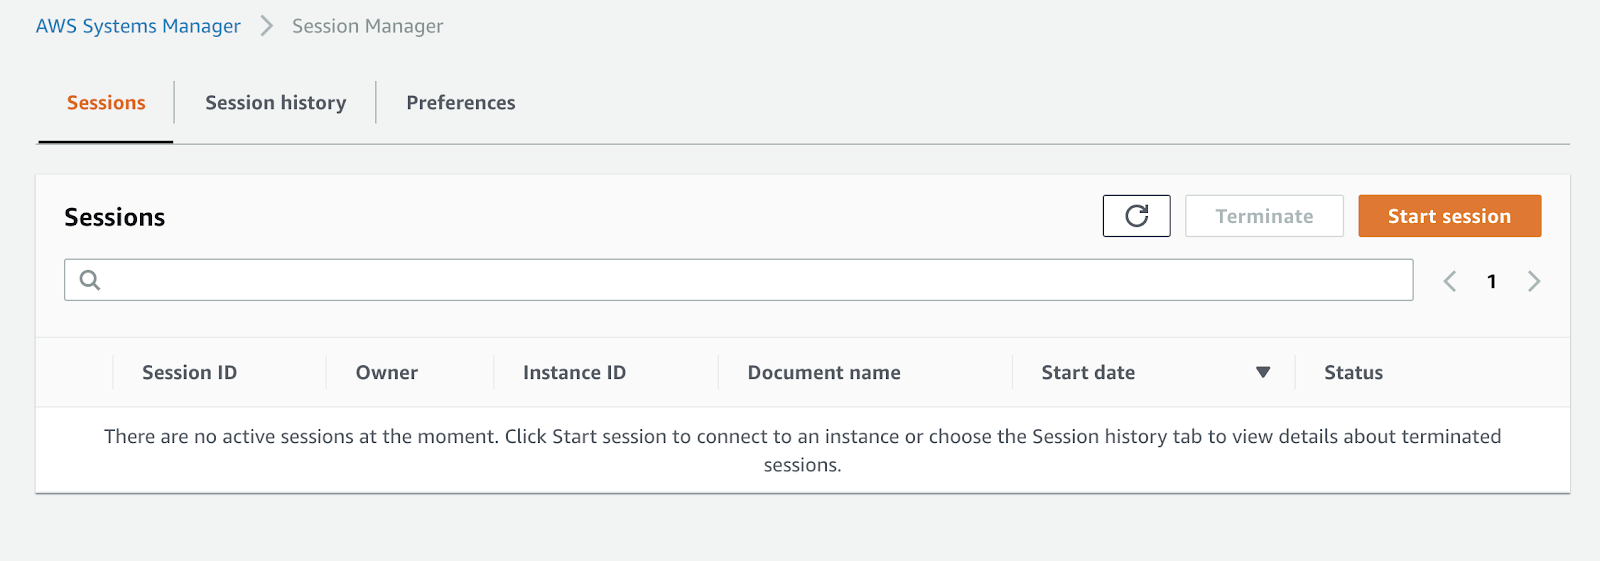
- Select the “Preferences” tab and click the “Edit” button.
- Under the “Send session output to CloudWatch Logs” section, check the box that says “CloudWatch logs.”
- Under the “CloudWatch log group” section, select the name of the log group you will use for session data. It should look something like this:
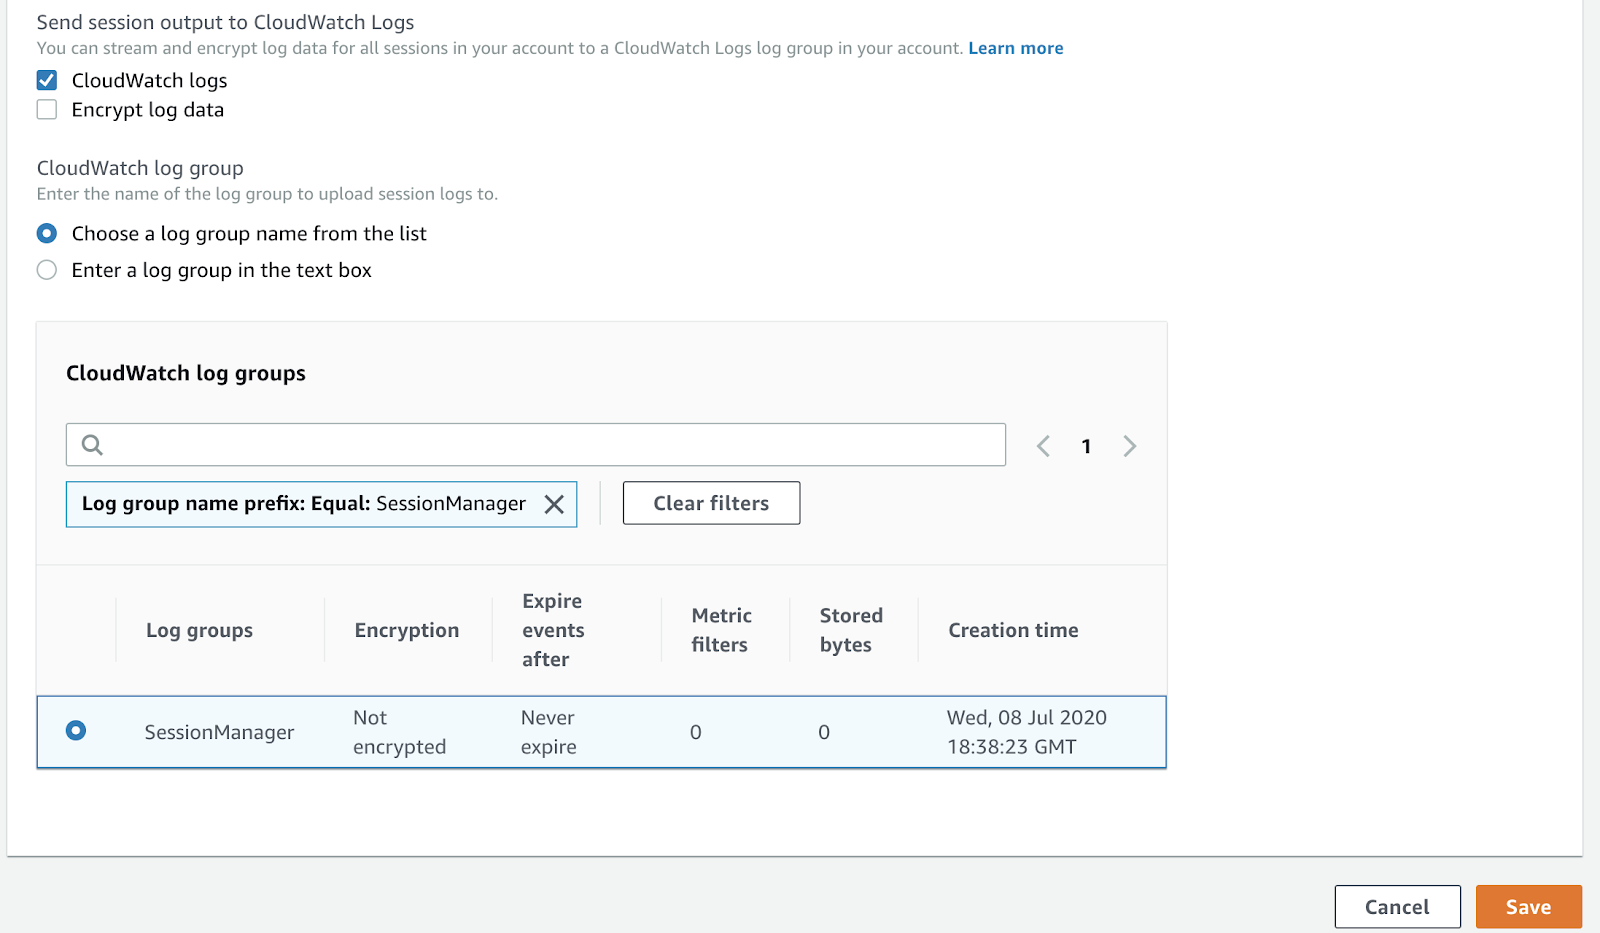
- Click the “Save” button.
- Now, we need to give the EC2 instances enough permissions to write events to the CloudWatch Log group. This documentation shows the IAM permissions that should be granted to the instance profile in order to allow SSM to write session logs to CloudWatch or an S3 bucket.
Logs without the CloudWatch agent
Session Manager will actually log session data to CloudWatch without having to install the CloudWatch agent. If the correct permissions have been given to the instance profile, then it will start to write the logs to CloudWatch. Session Manager will automatically create a new log stream for each session ID (the username and a unique string).
Logs with the CloudWatch agent
This section will cover how to save logs to CloudWatch using the CloudWatch agent. There are options to encrypt the logs, but the example below does not cover it for the sake of brevity:
- Install the CloudWatch agent on the EC2 instances. You can do this using a few different methods.
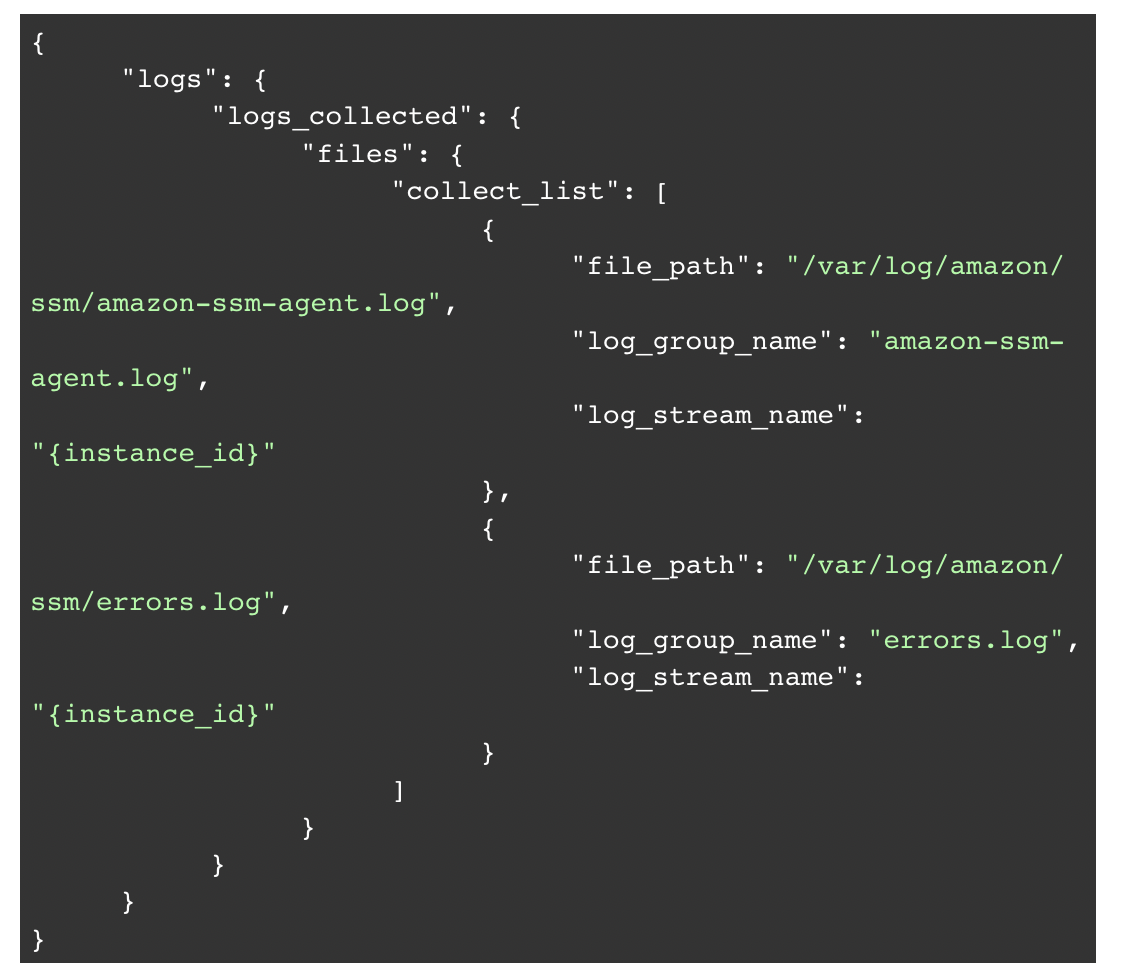
- Once the CloudWatch agent has been installed, you must create a configuration file before you can start it. You can launch a wizard to help create the file, or you can find examples online. Here is an example config generated by the wizard that will only send Session Manager logs, and do nothing else:

- Now you must start the CloudWatch agent.
Viewing CloudWatch logs
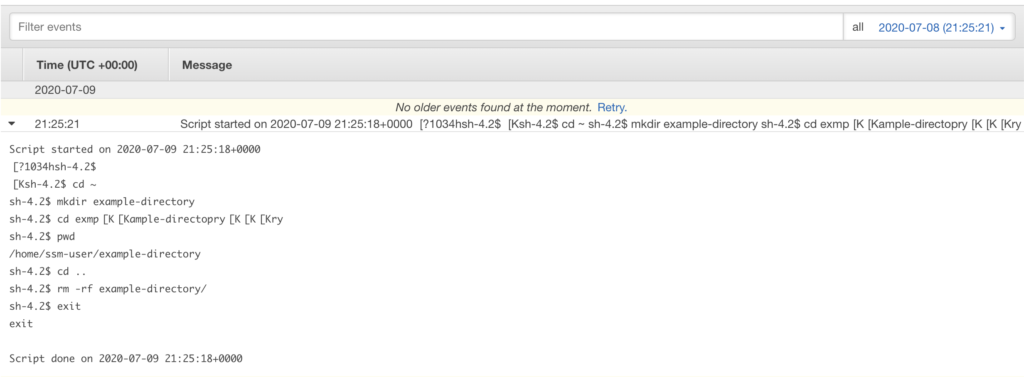
Regardless of the method being used to send logs to CloudWatch, you will see logs appear in CloudWatch for each Session Manager session, which will include the full history of commands issued by the user. Looking at these events in the CloudWatch Logs console, it will look something like this for each session:
Session data in S3
As an alternative to using CloudWatch, it is possible to save session data logs to an S3 bucket. First, you must create a bucket or prefix to hold the session logs. Next, you must ensure that the instance profile of the EC2 instances has access to write to the bucket or prefix. The final step is to select the S3 bucket in the Session Manager Preferences:
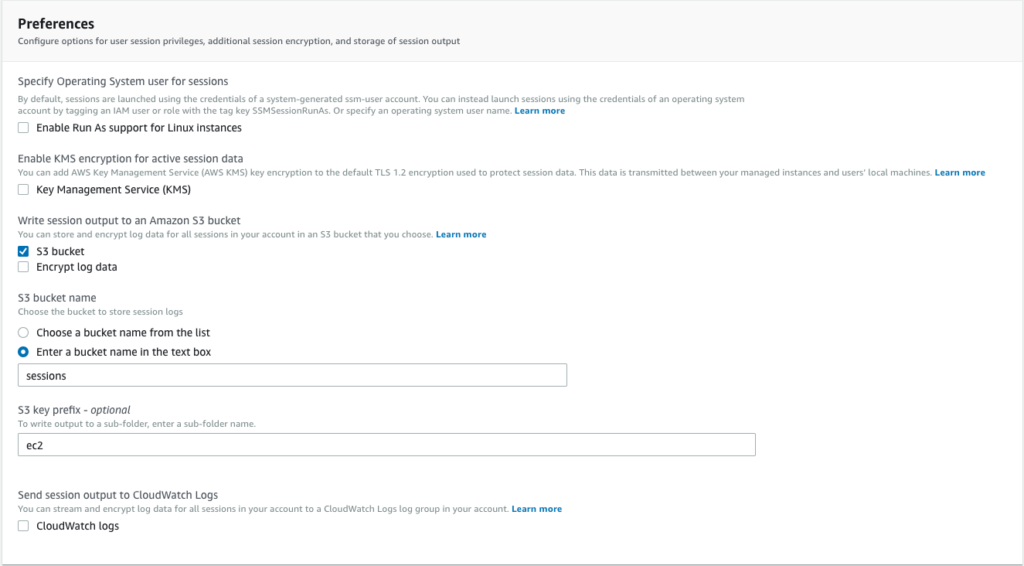
Creating a VPC endpoint for S3
If you would like to keep the logging traffic within the AWS VPC (and not traverse the internet), then you must create a VPC endpoint for S3 in your region. Unlike the interface endpoints for Systems Manager and CloudWatch Logs, this is a gateway endpoint. Once you’ve created the endpoint, you must create a route to it within the route table used by your target subnets. However, the route table does not contain a reference to the actual endpoint. Instead, it references the managed prefix list that contains the endpoint. The resulting route table will contain a reference to an ID that starts with “pl” for prefix list:

If your Network ACL for the subnet does not already allow the outgoing HTTPS traffic, then you’ll have to allow traffic to and from the CIDR block associated with the endpoint (not the prefix list).
Next, you need to make sure that one of the security groups associated with the target EC2 instances allows egress HTTPS communication with the S3 endpoint. Like the route tables, security groups use the prefix list (pl-68a54001), so the security group must contain an entry like the following:
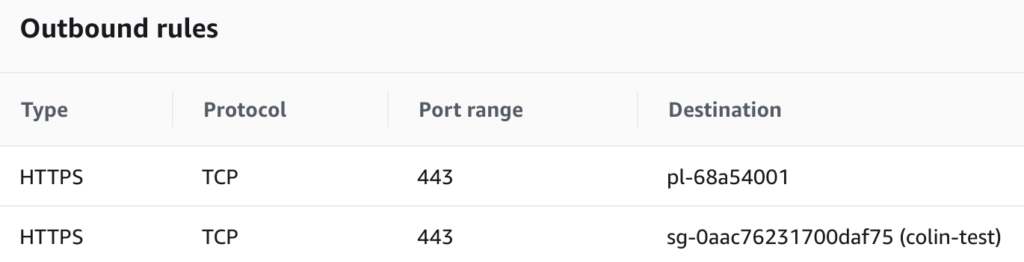
The image above only contains “Outbound rules” because we only needed to create permission for egress HTTPS traffic to the Prefix List containing the S3 endpoint. No changes to the “Inbound rules” are required.
Log results
The result is that you will see log files written to the specified bucket with the name of the session (the username and a unique string). The logs contain the commands typed, along with their output, which is the same as what is shown in CloudWatch.
Conclusion
In this post, we showed how using AWS Session Manager can be used to remotely access your EC2 instances, and the solution we implemented with this service met all of the following requirements:
- Public IP addresses are not required to be associated with the virtual machines in order to enable remote access.
- Eliminate the possibility of SSH multiplexing attacks.
- Consolidate access (such as SSH or RDP) to IAM credentials.
- Capture metadata and full session logs (when possible) for remote access.
Session Manager can make use of VPC endpoints for various services around access and logging, so exposure to the internet is minimized.
The next post in our blog series will examine a similar solution in Azure, and then ultimately, how you could implement a cross-cloud solution using Netskope Private Access. With all of the alternatives available now, it makes sense to examine these solutions in an effort to avoid having to manage bastion host infrastructure, logging, and keys.